ThymeLeaf
视频教程:https://www.bilibili.com/video/BV1qy4y117qi/
现在市面上大部分的Web教程都是SpringBoot和Vue或者React的前后端分离的教程,但是很多的朋友都会遇到这样一种情况,就是去公司以后,还是会遇到这种混合模板开发的项目,甚至还要维护一些Jsp的老项目,这种情况就很头痛,很多人就会吐槽啊 2021年啦,还在用混合开发,其实技术是为业务服务的,有些项目有些情况就适合用混合开发,没得说的。 给大家带来一个Thymeleaf的快速入门教程。
Thymeleaf 是一款用于渲染 XML/XHTML/HTML5 内容的模板引擎。
它与 JSP,Python的jinja2等模板引擎类似,Thymeleaf 最大的特点是,即使不启动 Web 应用,也可以直接在浏览器中打开。
一、初始化创建项目
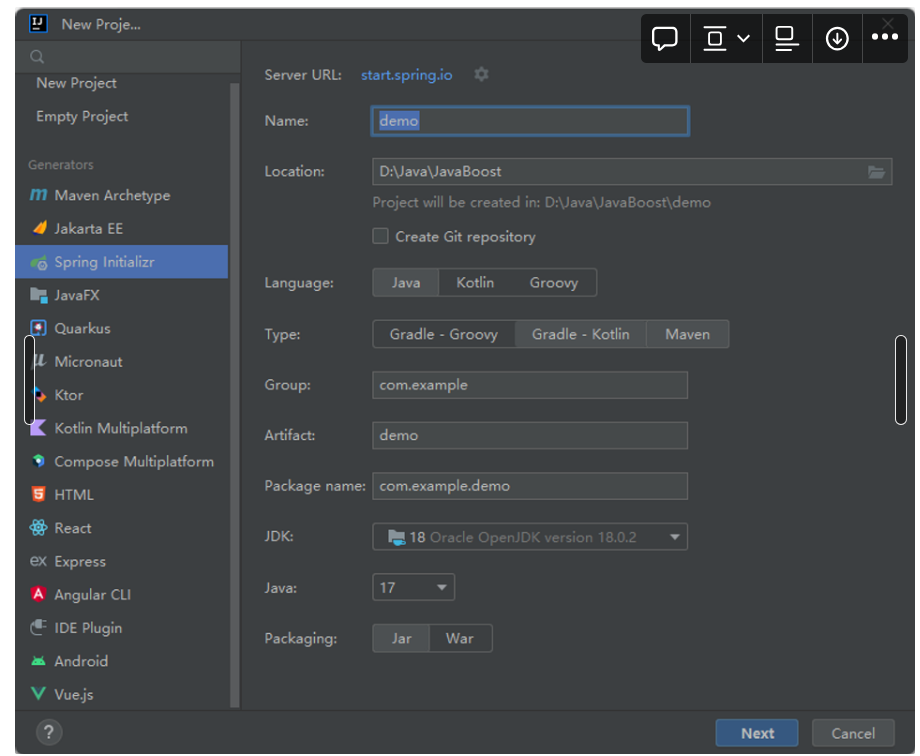
打开IEDA创建一个Spring项目

勾选需要的东西:

这样就创建成功啦
①在配置文件中禁用thymeleaf缓存(开发过程中)
1
2
3
4
5
6
| server:
port: 8001
spring:
thymeleaf:
cache: false
|
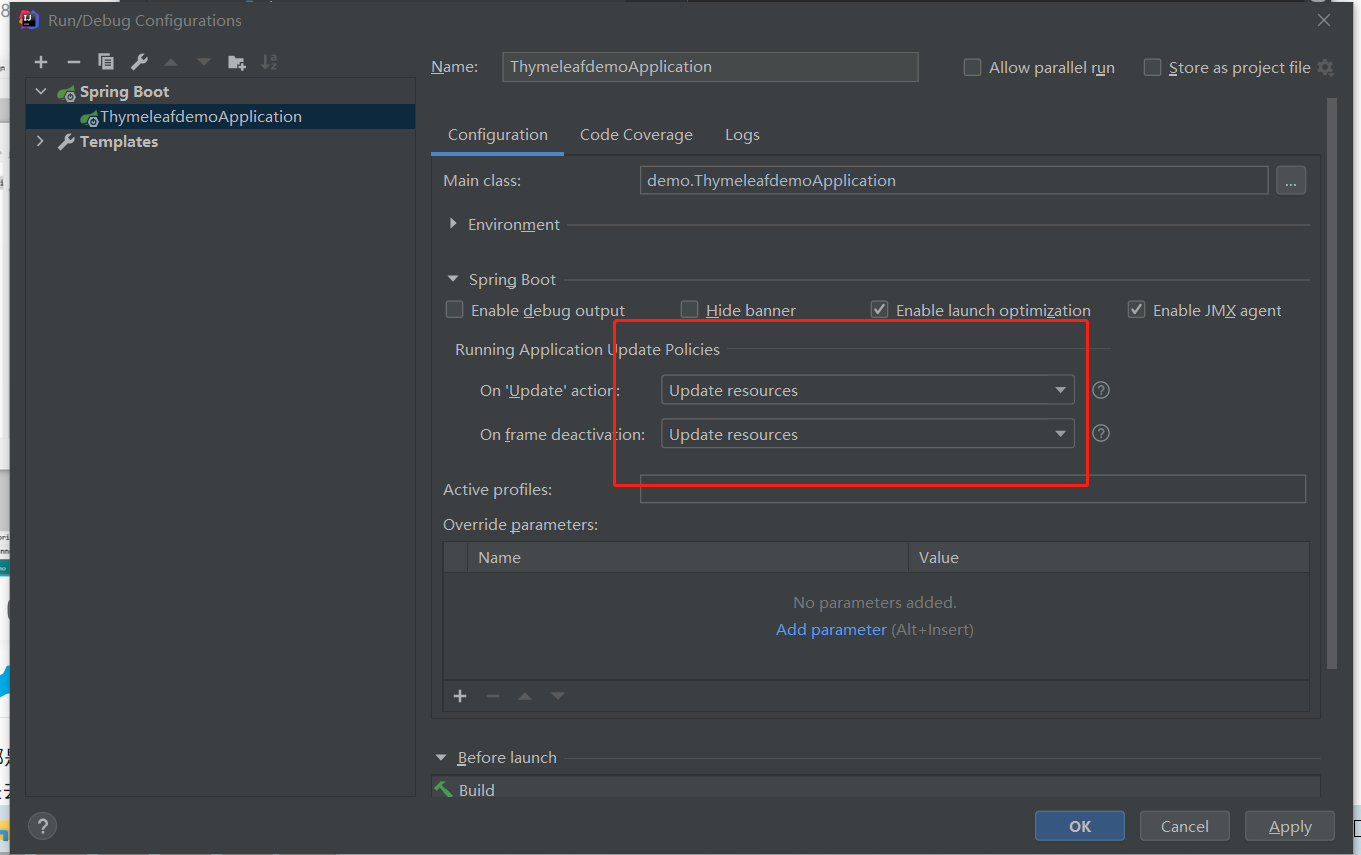
②在edit configuration中修改

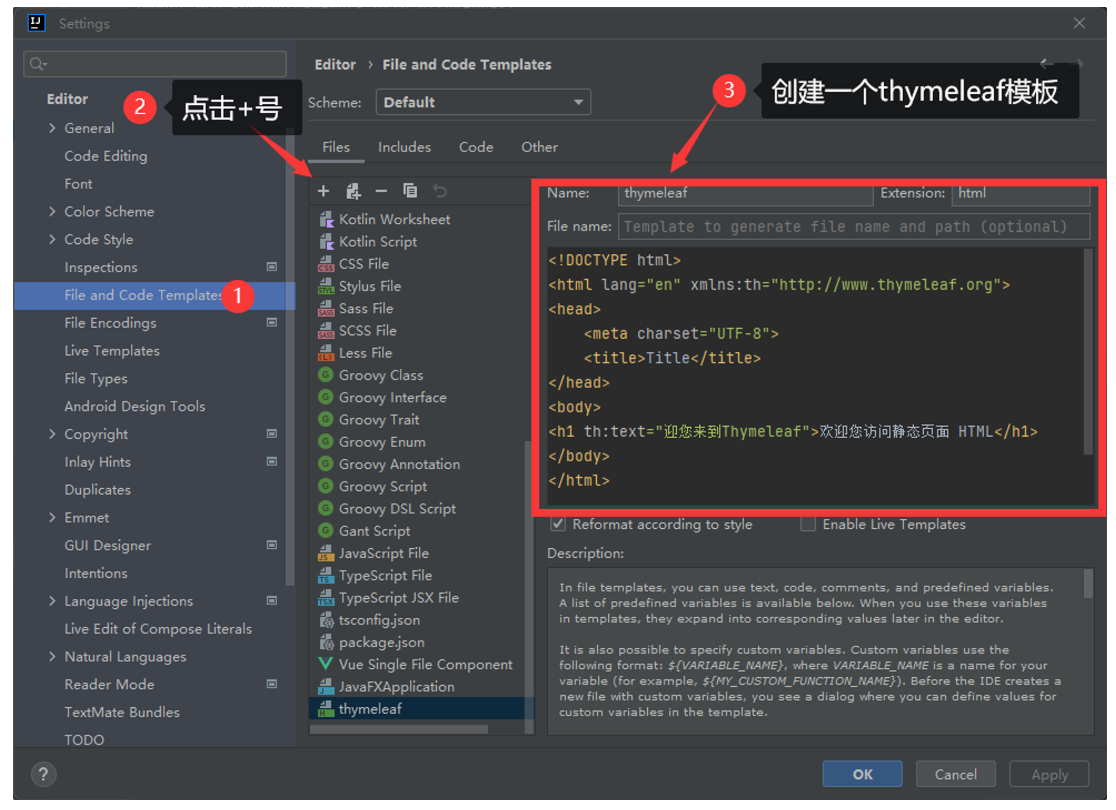
③创建ThymeLeaf模板文件

图片里面的代码如下:
1
2
3
4
5
6
7
8
9
10
| <!DOCTYPE html>
<html lang="en" xmlns:th="http://www.thymeleaf.org">
<head>
<meta charset="UTF-8">
<title>Title</title>
</head>
<body>
<h1 th:text="迎您来到Thymeleaf">欢迎您访问静态页面 HTML</h1>
</body>
</html>
|
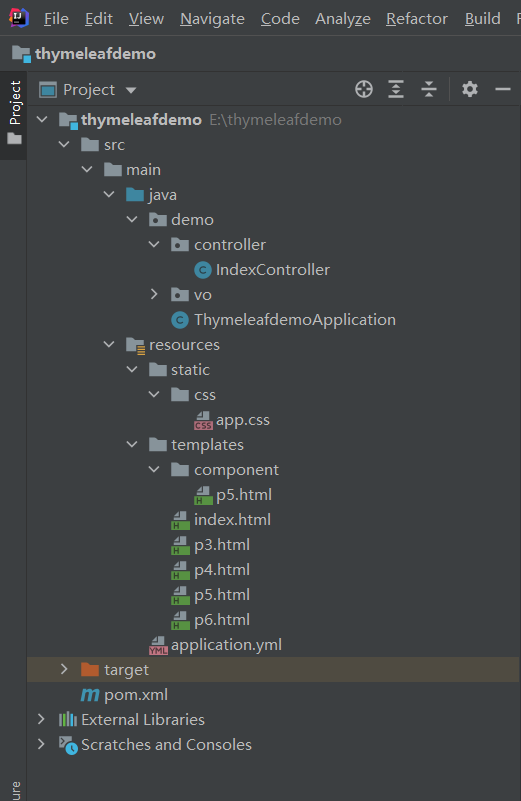
项目结构:

二、快速入门
创建一个最简单的控制器
1
2
3
4
5
6
7
8
9
10
11
| @Controller
public class IndexController {
@GetMapping("/index")
public String index(Model model) {
model.addAttribute("h1","但是还行!!");
model.addAttribute("text_p","毫无意义的文字");
return "index";
}
}
|
th:text动静分离
在template文件夹下创建index.html
- 通过
th:text来指定文件的内容, - 通过
”${h1}”来指定传递过来的值, - 通过
+或者是||进行字符串拼接
1
2
3
4
5
6
7
8
9
10
11
12
13
14
| <!DOCTYPE html>
<html lang="en" xmlns:th="http://www.thymeleaf.org">
<head>
<meta charset="UTF-8">
<title>Title</title>
</head>
<body>
<h1 th:text="迎您来到Thymeleaf">欢迎您访问静态页面 HTML</h1>
<h1 th:text="${h1}"></h1>
<h1 th:text="'我是普通内容= ' + ${text_p}">title</h1>
<h1 th:text="|我是普通内容= ${text_p}|">title</h1>
</body>
</html>
|
三、常用方法
创建实体对象
方便我们后期的展示
1
2
3
4
5
6
7
8
9
| @Data
public class User {
String username;
int age;
int sex;
boolean isVip;
List<String> tags;
Date date;
}
|
创建控制器
1
2
3
4
5
6
7
8
9
10
11
| @GetMapping("/p3")
public String entity(Model model) {
User user = new User();
user.setUsername("Look");
user.setAge(18);
user.setSex(1);
user.setVip(true);
user.setTags(Arrays.asList("PHP", "Java", "Python"));
model.addAttribute("user",user);
return "p3";
}
|
基础标签使用
- 通过
th:text和${uesr.username}展示用户名称 - 通过
th:switch进行多条件的判断 - 通过
th:if进行条件的判断 - 通过
th:each进行对象的遍历
1
2
3
4
5
6
7
8
9
10
11
12
13
14
15
16
17
18
19
20
21
22
23
24
25
| <!DOCTYPE html>
<html lang="en" xmlns:th="http://www.thymeleaf.org">
<head>
<meta charset="UTF-8">
<title>Title</title>
</head>
<body>
<h1 th:text="${user.username}"></h1>
<h2 th:text="${user.age}"></h2>
<div th:switch="${user.sex}">
<p th:case="1">男</p>
<p th:case="0">女</p>
<p th:case="*">未知</p>
</div>
<div th:if="${user.isVip}">你是尊贵的Vip</div>
<ul>
<li th:each="tag:${user.tags}" th:text="${tag}"></li>
</ul>
</body>
</html>
|
- 通过
th:object进行暂存对象,使用*{}代表object中的对象
1
2
3
4
| <div th:object="${user}">
<h2 th:text="*{username}"></h2>
<p th:text="*{age}"></p>
</div>
|
总结:
1
2
3
4
5
6
7
8
9
10
11
12
13
14
15
16
17
18
19
20
21
22
23
24
25
26
27
28
29
30
31
32
33
| <!DOCTYPE html>
<html lang="en" xmlns:th="http://www.thymeleaf.org">
<head>
<meta charset="UTF-8">
<title>Title</title>
</head>
<body>
<h1 th:text="${user.username}"></h1>
<h2 th:text="${user.age}"></h2>
<div th:switch="${user.sex}">
<p th:case="1">男</p>
<p th:case="0">女</p>
<p th:case="*">未知</p>
</div>
<div th:object="${user}">
    <h2 th:text="*{username}"></h2>
    <p th:text="*{age}"></p>
</div>
<div th:if="${user.isVip}">你是尊贵的Vip</div>
<ul>
<li th:each="tag:${user.tags}" th:text="${tag}"></li>
</ul>
</body>
</html>
|
四、Js、css的使用
创建控制器
1
2
3
4
5
6
7
| @GetMapping("/p4")
public String javascript(Model model) {
User user = new User();
user.setTags(Arrays.asList("PHP", "Java", "Python"));
model.addAttribute("user",user);
return "p4";
}
|
创建前端
引入css
在static文件夹下创建一个app.css内容如下:
1
2
3
4
5
| .app{
height: 200px;
width: 200px;
background-color: gold;
}
|
在template文件夹下创建p4.html,通过th:href导入CSS
1
2
3
4
5
6
7
8
9
10
11
12
13
| <!DOCTYPE html>
<html lang="en" xmlns:th="http://www.thymeleaf.org">
<head>
<meta charset="UTF-8">
<title>Title</title>
<link rel="stylesheet" th:href="@{/app.css}" >
</head>
<body>
<div class="app">
1
</div>
</body>
</html>
|
引入js
在html文件的head中,添加
1
| <script type="text/javascript" th:src="@{/sptccjs/jquery-1.8.3.js}"></script>
|
如何在js中拿到动态数据
通过阴间语法/*[[${user}]]*/{};将对象导入到javascript中
1
2
3
4
5
6
| <script th:inline="javascript">
const user = /*[[${user}]]*/{};
console.log(user)
</script>
|
通过th:classappend追加CSS
通过${idx.last}判断是不是最后一个
完整代码:
1
2
3
4
5
6
7
8
9
10
11
12
13
14
15
16
17
18
19
20
| <!DOCTYPE html>
<html lang="en" xmlns:th="http://www.thymeleaf.org">
<head>
<meta charset="UTF-8">
<title>Title</title>
<link rel="stylesheet" th:href="@{/css/app.css}" >
</head>
<body>
<div class="app">
1
</div>
<script th:inline="javascript">
const user = /*[[${user}]]*/{};
console.log(user)
</script>
</body>
</html>
|
五、组件(fragment)
创建控制器
1
2
3
4
| @GetMapping("/p5")
public String p5(Model model) {
return "p5";
}
|
创建前端
创建templates/comonent/p5.html这个用来存储我们的组件,代码如下:
- 通过
th:fragment指定组件的名称 - 或者通过给
组件一个id,后面通过id使用组件
1
2
3
4
5
6
7
8
9
10
11
12
13
14
15
16
17
18
19
20
21
22
23
24
| <!DOCTYPE html>
<html lang="en" xmlns:th="http://www.thymeleaf.org">
<head>
</head>
<div th:fragment="header">
<div style="height: 100px; background-color: gold">
<h1>I'am Header</h1>
</div>
</div>
<div th:fragment="footer">
<div style="height: 100px; background-color: cornflowerblue">
<h1>I'am Footer</h1>
</div>
</div>
<div id="body">
<div style="height: 100px; background-color: yellowgreen">
<h1>I'am Body</h1>
</div>
</div>
</html>
|
创建templates/p5.html用来最为最终的渲染
- 通过
th:insert="component/p5::header"将这个组件插入到div当中去 - 通过
th:insert="component/p5::#body",通过id寻找组件,并插入到div当中去 - 通过
th:replace="component/p5::footer",将组件替换掉div标签
1
2
3
4
5
6
7
8
9
10
11
12
13
14
| <!DOCTYPE html>
<html lang="en" xmlns:th="http://www.thymeleaf.org">
<head>
<meta charset="UTF-8">
<title>Title</title>
</head>
<body>
<div th:insert="component/p5::header"></div>
<div th:insert="component/p5::#body"></div>
<div th:replace="component/p5::footer"></div>
</body>
</html>
|
六、工具类的使用
创建控制器
1
2
3
4
5
6
7
8
9
| @GetMapping("/p6")
public void p6(Model model, HttpServletRequest req) {
req.getSession().setAttribute("test","西瓜");
User user = new User();
user.setUsername("P6");
user.setDate(new Date());
model.addAttribute("user",user);
}
|
创建前端
创建templates/p6.html文件,内容如下:
- 通过
${session.test}获取Session的内容 - 通过`$


